Google Ads Conversion Tracking

Nick Czerwinski

PPC & Local SEO Specialist

Are you feeling uncertain about the true impact of your Google Ads pay-per-click campaign, despite receiving clicks and impressions? To truly gauge the success of your lead generation and conversion efforts, tracking what happens after users click on your ad is crucial.

In this comprehensive guide, you will discover the power of Google Ads conversion tracking and how it can help you measure the effectiveness of your campaigns. From understanding the importance of conversion tracking to learning how to set it up correctly and troubleshoot common issues, this blog post will arm you with all the knowledge and tips you need to maximize the impact of your Google Ads campaigns.

What Is Conversion Tracking In Google Ads?

Google Ads conversion tracking provides insights into users’ actions after interacting with your ads. As a free and integral tool within Google Ads, conversion tracking is crucial for measuring and improving the return on investment from your campaigns.

To fully leverage the benefits of Google Ads conversion tracking, setting up the conversions that matter most to your business is crucial. Unfortunately, Google cannot guess which results you want to track. That’s why it’s important to identify and configure the conversions that hold the greatest value for your business within your Google Ads account. By doing so, you’ll be able to measure and optimize your campaigns for maximum impact effectively.

Why Is Conversion Tracking Important In Google Ads?

Conversion tracking is an absolute must to get the most out of your Google ad campaigns. Here are some of the most significant benefits this powerful tool can offer:

Measuring Performance: Conversion tracking allows you to accurately measure the performance of your campaigns by tracking the specific actions that users take after clicking on your ad, such as filling out a form or making a purchase.

Optimizing Campaigns: By tracking conversions, you can identify which campaigns, ad groups, and keywords are driving the most valuable results for your business. This information can then be used to optimize your campaigns for better performance.

Unlocks Smart Bidding Options: Google Ads offers advanced smart bidding strategies that can give you greater control over your campaigns. However, to take advantage of features like Maximize Conversions and Target CPA, you must first enable conversion tracking within your account

How To Set Up Form Tracking In Google Ads

Setting up conversion tracking in Google Ads is a quick and straightforward process. To start, open your Google Ads account and select the Tools & Settings icon in the top right corner. From the Measurement menu, choose Conversions, then click the blue “+ New Conversion Action” button in the top left corner and select “Websites.”

Tools and Settings > Measurement > Conversions > New Conversion Action > Website

Google Ads Conversion Tracking - ROI Measurement

Next, copy and paste your website link under “Enter the URL for the website where you want to measure your conversions.” Google will scan your website to determine if it is already set up to measure a website conversion action.

Tools and Settings > Measurement > Conversions > New Conversion Action > Website

Mastering Google Ads Conversion Tracking - Expert Guide

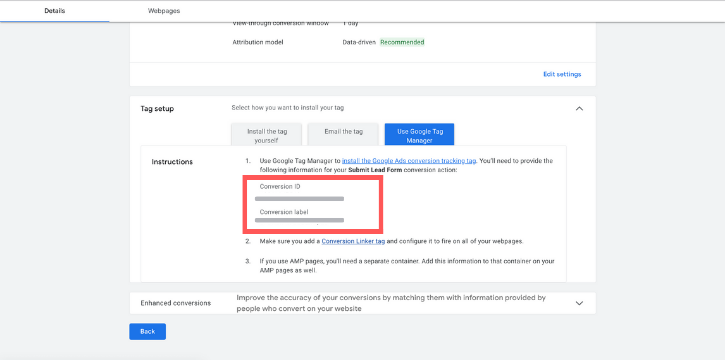
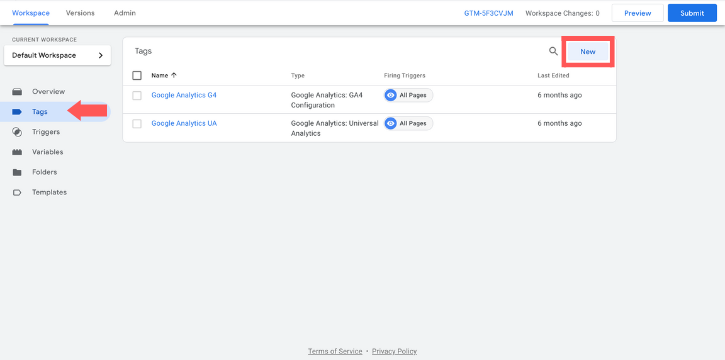
* These next steps require the use of Google Tag Manager. If you have not created your Google Tag Manager account, check out our Google Tag Manager Guide. *

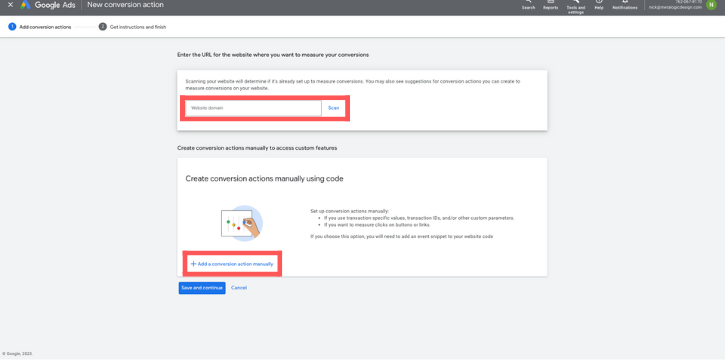
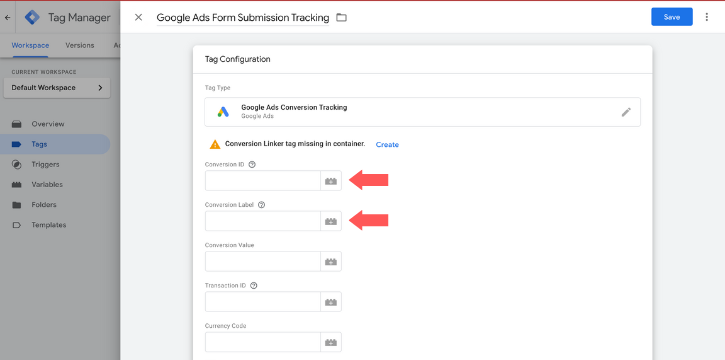
After Google scans your site, you can manually create your conversion actions by adding code to measure conversions. To get started, click the blue “Add a conversion action manually” button, and a new window will appear where you can choose the details of your conversion action.

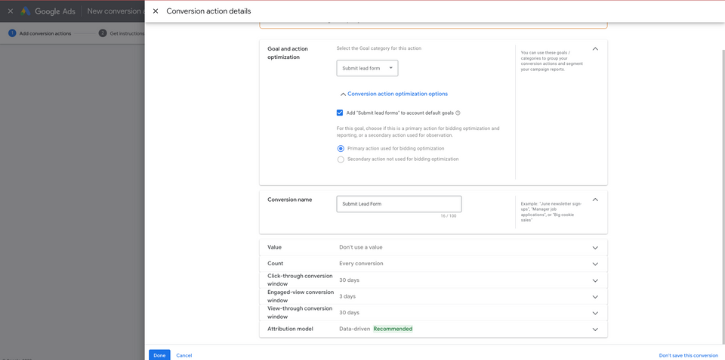
Maximize your form submission tracking with these optimal conversion action details. 

In the ‘Goal and action optimization’ section, choose the “Submit lead form” category and click “Conversion action optimization options” to reveal a drop-down menu. From there, select “Add ‘Submit lead forms’ to account default action” to make this goal a primary focus for bidding optimization and reporting.

Next, name your conversion action. We recommend simply naming this conversion action “Submit Lead Form,” but you can name the action as you, please. 

Under “Value”, we advise selecting the option “Don’t use a value for this conversion action”. This may not be the recommended approach by Google Ads, however, our objective is to accurately track the number of conversions. Assigning a value to each conversion action can give you an estimate of its worth to your business and help measure your advertising ROI. However, for our purposes, we prefer to focus solely on counting the number of successful conversion actions.

For “Count”, we suggest selecting “One”. This ensures that multiple submissions by a single person are not counted as multiple conversions, avoiding the possibility of skewing your conversion data in Google Ads. By choosing “One”, you are safeguarding against situations where a single individual may submit the form multiple times (such as when we once encountered a case where one person submitted the form 17 times). This allows you to maintain an accurate record of your conversion data in Google Ads.

The rest of the settings are as follows: 

Click Through Conversion Window: 30 days

Engaged-View Conversion Window: 3 days

View-Through Conversion Window: 30 days

Attribution Model: Data-driven (Recommended)

These settings allow you to specify the duration within which conversions can be attributed to your ads and to choose the attribution model that best suits your business needs. By using a 30-day “Click Through Conversion Window” and “View-Through Conversion Window”, you ensure that conversions are attributed to your ads even if they occur several days after a user has interacted with them. The “Engaged-View Conversion Window” of 3 days allows you to track conversions that happen soon after a user has engaged with your ad. The “Data-driven” attribution model is recommended as it utilizes advanced machine learning algorithms to determine your business’s most effective attribution model.

At the end of your setup process, your conversion action details should look like this:

Conversion Tracking in Google Ads - Success Measurement

Once you have finished setting up your ‘Submit lead form’ conversion action, select the blue ‘Done’ button and then click ‘Save and continue’ back on the ‘Add conversion actions’ screen to save your new conversion action.

Setting Up Your Conversions In Google Tag Manager

By clicking on the “Save and continue” button, you’ll be taken to the next stage of the conversion tracking setup process where you’ll be presented with three options for installing the tracking code on your website. These options will allow you to choose the most convenient and efficient method for setting up the conversion tracking code so that you can accurately track and measure the performance of your advertising campaigns.

Google Tag: This is a specific type of tracking code that you add to the page where the conversion takes place. It tracks actions such as form submissions, button clicks, or downloads.

Email Instructions To Your Webmaster: If you do not have access to the back end of your website or have an IT department, you can use this option to send the tracking code snippet and installation instructions to your webmaster. 

Google Tag Manager: This tag management system allows you to add and manage various marketing and analytics tags on your website without requiring code changes. You can install the conversion tracking code using Google Tag Manager by creating a new tag, selecting the conversion tracking tag type, and entering the conversion tracking information.

For this example, we will be setting up our form submission conversion action using Google Tag Manager.

Google Ads Conversion Metrics - Advertising ROI

When using the Google Tag Manager option, Google Ads will give you a Conversion ID as well as a Conversion Label. To insert this snippet of code onto your website, open a new tab and head over to tagmanager.google.com to create a new tag.

From your workspace, click the ‘Tags’ tab on the left-hand side and then click the blue ‘New’ button to begin setting up your form submission tag.

Effective Conversion Tracking - Google Ads Success

To stay organized in your workspace, it’s important to give your tag an appropriate name. To begin the tag configuration process, click on the “Choose a tag type to begin setup” button and select “Google Ads Conversion Tracking” as your tag type. The Google Ads Conversion Tracking tag will prompt you to enter the Conversion ID and Conversion Label, which are linked to the conversion action you created in Google Ads. Simply copy and paste both the Conversion ID and Conversion Label from Google Ads into your new tag, and then proceed to setting up the trigger for your tag. This process will ensure that your conversion tracking data is accurately recorded and synchronized between Google Ads and your website.

Google Ads Conversion Analysis - Boost ROI

The trigger in Google Tag Manager is what determines the conditions under which a tag should execute. To set up a trigger, click “Choose a trigger to make this tag fire” and create a new trigger by clicking the blue plus button. Give the new trigger a descriptive name, then click “Trigger Configuration” to select the type of trigger. In this case, select “Page View” and choose “Some Page Views.” Next, select “Page Hostname” and from the dropdown menu, choose “Page URL.” Under “Contains,” select “Equals” and then paste the URL of the thank you page that visitors are directed to after filling out your form. This will allow Google Ads to track all visitors who reach this page from one of your ads as a conversion. By setting up your trigger in this way, you can ensure that conversions are accurately recorded in Google Ads.

Optimizing Google Ads Conversions - Tracking

After you have finished setting up your tag and trigger, it’s time to save and publish. Simply click the blue “Save” button in the top right corner, then click “Submit” from the workspace. Next, click “Publish” to create a Container Version Description, or choose to “Skip” if desired. With these steps complete, your Google Tag is now live and ready to track conversions on your website.

Double Checking Your Tag Installation

Using Tag Manager

Begin the preview process by clicking the “Preview” button located in the top right of your Google Tag Manager workspace. This opens the Google Tag Assistant (Beta), which you can access by pasting the URL of your container into the specified field and clicking “Connect”. This activation of the debug mode will allow you to view any Google Tag errors and verify the proper functioning of your setup.

Measuring Success with Google Ads Conversions

After loading your website, you will receive a notification from the Google Tag Assistant indicating a successful connection: “Google Tag Assistant Connected.” Switch to the “Tag Assistant [Connected]” tab to see which tags have fired and which ones have not fired on the current page.

Google Ads Conversion Tracking Strategies

Using Tag Assistant Legacy

If you utilize Google Chrome as your browser, head over to the Chrome Web Store and perform a search for “Google Tag Manager.” From the search results, choose the “Tag Assistant Legacy (by Google)” and install the extension to your browser. You can verify the successful installation of the extension by checking for the blue smiling tag icon located on the right side of your search bar. In case it is not visible, you can access “Manage Extensions” by clicking the puzzle piece icon on the right-side of the search bar and activate the Tag Legacy Assistant.

Once the extension has been enabled, click on the blue smiling tag and choose “Enable.” Afterwards, go back to your container URL and refresh the page. You can now open the Tag Legacy Assistant to view all the tags on the page and make sure all the tags that you submitted in Google Tag Manager are firing correctly.

Improving ROI with Google Ads Conversion Metrics

Built for B2C Services

At Metalogic Design, we go beyond generating superficial leads. Our focus is on delivering tangible results for B2C service companies — driving qualified engagements that convert to real business impact.

Check Us Out On

Honestly, I consider him part of my Team as well, he really cares about our success. As we grow, he will grow with us. I’m excited about the journey and future with Mike and his Team at Metalogic! If you’re looking at Internet Marketing for your business, simply put he’s the best!

Chris Chustz

Owner, Family First Mortgage

Check If Your Conversions Are Tracking

Conversion Tracking Mastery - Google Ads

To check if your Google Ads conversion tracking is set up correctly, go to the Campaigns tab and look at the Conversions column. If the number of conversions is greater than zero, your tracking is working. If not, go to Tools & Settings and select Conversions under the Measurement menu. Check the recording conversions status. If it’s not recording, there may be some common issues:

Unverified: The conversion tracking tag has been installed, but no conversions have been recorded. You can troubleshoot by clicking the blue Verify button in the status column and using Google’s Tag Assistant tool to test the tag.

No recent conversions: This status appears when no conversions have been recorded in the last week or more. Double-check your conversion tracking setup to troubleshoot and ensure that your ads link to a tagged landing page.

Tag inactive: This status indicates that the conversion tracking tag has been removed from the landing page or is not working correctly. To resolve this, reinstall the conversion tracking tag to resume tracking.

Troubleshooting Google Ads Conversion Tracking

Although the reporting of Google Ads conversions usually happens promptly, it’s possible that it may take a full day for all conversions to be processed and visible in your account. This can vary depending on various elements like the type of conversion, website traffic, and your location as an advertiser.

However, there could be situations where the conversion tracking in Google Ads may not work as expected. To help keep your tracking accurate and functioning well, let’s look at some common problems and their straightforward solutions:

Incorrect Tracking Code: Make sure that the tracking code installed on your website is the same one associated with your Google Ads account. Double-check that the code is installed correctly and on all pages where conversions occur.

Misconfigured Conversion Actions: Ensure that the conversion actions you have set up in your Google Ads account match the actions on your website. The tracking will be incorrect if a conversion action is set up differently.

Blocked Cookies: If your website visitors have their cookies blocked, the tracking code won’t work. Make sure that your website informs users about cookies and provides them with the option to accept them.

Slow Page Load Speeds: If your website loads slowly, this can affect the tracking code’s ability to track conversions. Optimize your website for fast load speeds to avoid this issue.

By following these simple troubleshooting steps, you can ensure that your Google Ads conversion tracking is accurate and working correctly. If you still have issues, consider contacting the Google Ads support team for further assistance.

Custom Marketing Plans Starting at $500 / month

Conclusion

In conclusion, setting up form tracking in Google Ads can provide valuable insights into your website’s performance and help you make informed decisions about your online advertising strategy. By following the step-by-step process outlined in this blog, you can easily configure your conversion tracking code and keep track of important metrics like form submissions and conversions. Whether you are a seasoned marketer or just starting out, incorporating form tracking into your Google Ads account is a simple and effective way to improve your website’s performance and drive more conversions. With its user-friendly interface and customizable features, Google Ads makes it easy to monitor your website’s performance and make informed decisions about your advertising efforts.

Become A Google Ads Specialist With MetaLOGIC's Local Digital Marketing Academy

Get your business in front of the right people with Google Ads. From display and search campaigns to Shopping and video campaigns, there’s a way to reach your target audience on the Google Ads platform. Don’t wait to see results – Learn more about our Google Ads Online Training Course.

Leave a Reply

Your email address will not be published. Required fields are marked *