Guide - How To Add Google Ads To Tag Manager

Nick Czerwinski
PPC & Local SEO Specialist
Google Ads conversion tracking is a crucial aspect of any online advertising campaign. It allows you to measure the success of your ad campaigns and gain insights into how users interact with your website. With the help of Google Tag Manager, setting up and managing these conversions becomes more efficient and flexible.
Before we dive into the detailed steps for setting up Google Ads form conversions in Google Tag Manager, let’s start with the prerequisites. You’ll need the following in place to get started:
A Google Ads Account
If you’re reading this, you likely already have a Google Ads account. If not, you’ll need to create one. Google Ads is the platform where you create and manage your online advertising campaigns, and it’s where you’ll set up your form conversion tracking.
A Google Tag Manager Account
Google Tag Manager (GTM) is a powerful tool for managing various tracking codes and tags on your website without having to manually edit the site’s code. If you haven’t set up a Google Tag Manager account yet, now is the time to do so. You can create an account by visiting Google Tag Manager and following the setup process.
A Working Form on Your Website
To track form conversions, you obviously need a form on your website that visitors can fill out. This form could be a contact form, a signup form, a request-a-quote form, or any other type of form that serves your website’s goals. Make sure the form is functional and actively used by your site’s visitors.
Understanding the Importance of Adding Google Ads to Tag Manager
Form conversion tracking is a fundamental aspect of any successful Google Ads campaign. It’s not just a nice-to-have feature; it’s an essential tool for optimizing your advertising efforts and maximizing your Google Ads ROI. Let’s explore why form conversion tracking matters:
1. Measure Advertising Effectiveness
Identify High-Performing Ads: Google Ads form conversion tracking allows you to distinguish between ads that generate leads or sales and those that don’t. By tracking which ads lead to form submissions, you can focus your budget and efforts on the most effective ad campaigns.
2. Understand User Behavior
Gain Insight into User Actions: Tracking form submissions provides valuable insights into user behavior on your website. You can see which pages users visit before submitting a form, how long they spend on your site, and the specific actions they take. This information helps you tailor your marketing strategy and improve user experience.
3. Optimize Ad Spend
Allocate Budget Wisely: Without conversion tracking, you might be blindly allocating your budget to different ad campaigns. With tracking in place, you can allocate more budget to campaigns that drive conversions and adjust or pause those that underperform, ultimately reducing wasted ad spend.
4. Refine Ad Copy and Design
Improve Ad Creatives: Tracking form conversions enables you to refine your ad copy, design, and call-to-action buttons. You can A/B test different elements to determine what resonates best with your audience and encourage them to complete the form.
5. Measure ROI
Calculate Return on Investment: By assigning a value to each conversion (e.g., a lead or a sale), you can calculate the ROI of your Google Ads campaigns accurately. This data helps you make informed decisions about your advertising budget and strategy.
6. Align Marketing Goals
Optimize Landing Page Design: Form conversion tracking can reveal issues with your website’s landing pages. If users frequently abandon forms without submitting them, it may indicate problems with page load times, form complexity, or design. Addressing these issues can lead to higher conversion rates.
7. Align Marketing Goals
Align with Business Goals: Tracking form conversions aligns your marketing efforts with your business objectives. Whether your goal is lead generation, e-commerce sales, or inquiries, form tracking ensures you’re on the right path to achieving those objectives.
8. Improve Ad Campaign ROI
Maximize Advertising ROI: Ultimately, the goal of any advertising campaign is to generate a positive return on investment. Form conversion tracking is your compass in achieving this goal. It provides the data and insights needed to continually refine and optimize your campaigns for better results.
Setting Up Form Conversions in Google Ads
Once you have set up your Google Ads account, we will need to create a form conversion action to track visitors that converted from clicking on your Google Ad.
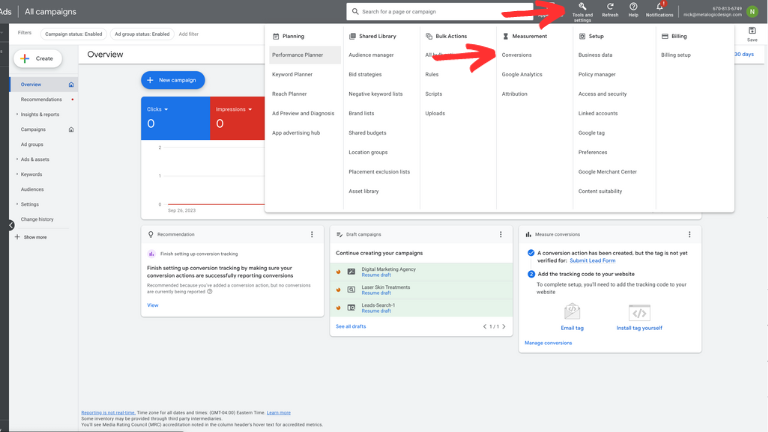
From the Google Ads home menu, locate and click ‘Tools and settings’ in the upper right header and select ‘Conversions’ under the ‘Measurement’ tab.
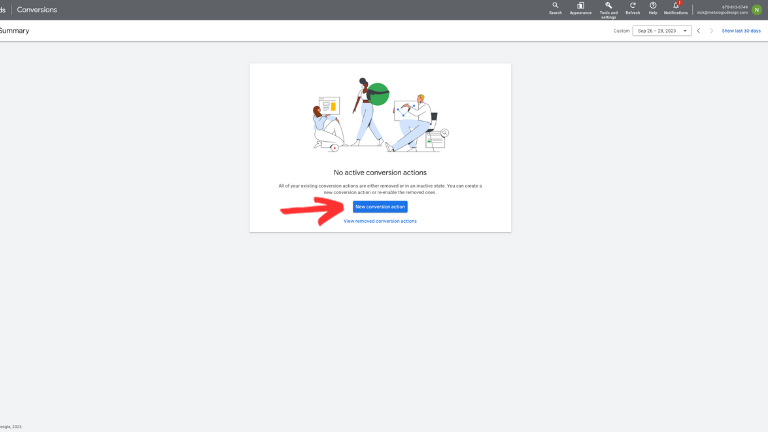
On the summary page, click the blue button with the text ‘+ New conversion action’

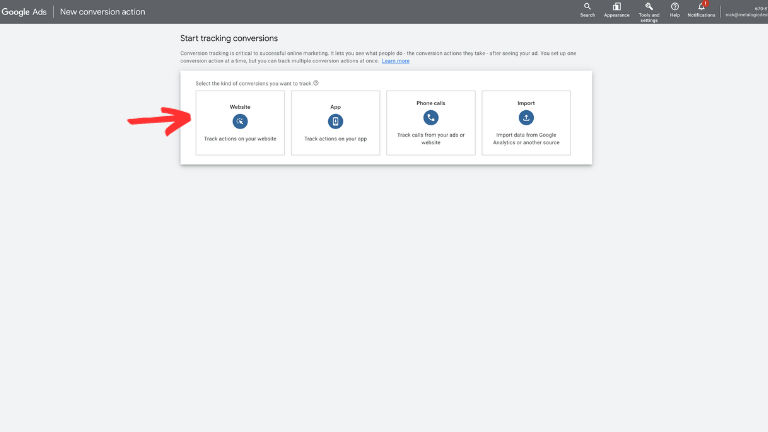
Under ‘Start tracking conversions’ on the next page, click ‘Website’, paste your company’s URL into the field and click ‘Scan’ (This is Google crawling your website to determine if it is already set up to measure conversion actions).
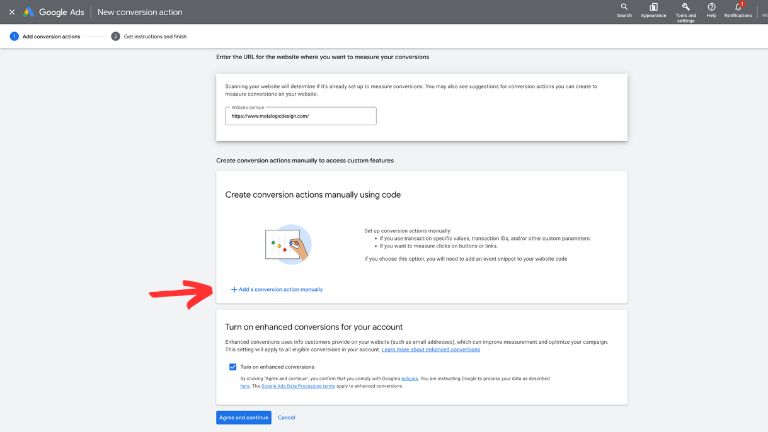
Once your website has been scanned successfully, you will need to create a conversion action manually. To do this click the text ‘+ Add a conversion action manually’ highlighted in blue
Next, we need to configure your conversion action details. Here are the settings you will want to use to track form conversions in Google Ads:
- Goal and action optimization: Submit lead form
- Converson name: (You can name this whatever you want)
- Value: (This is determined by the business. If you offer multiple services with varying prices we recommend selecting ‘Don’t use a value for this conversion action (not recommended)).
- Count: One
- Click-through conversion window: 30 days
- Engaged-view conversion window: 3 days
- View-through conversion window: 1 day
- Attribution: Data-driven
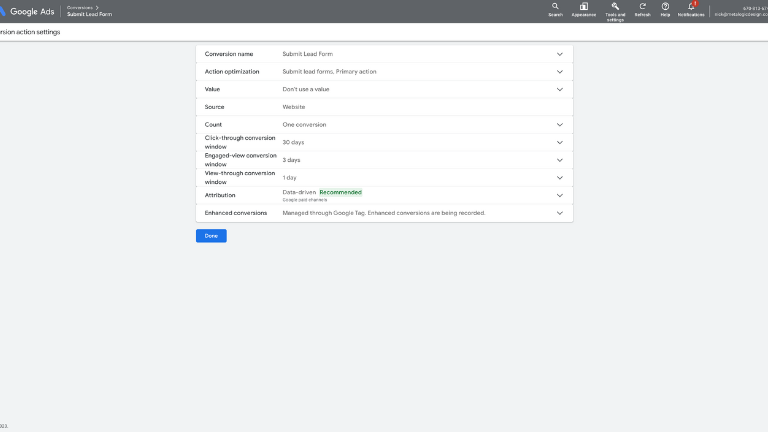
Once you have finished configuring your conversion action details, click ‘Done’ and turn on enhanced conversions by checking the box under ‘Turn on enhanced conversions for your account’. Click ‘Agree and continue’ to move on to begin setting up your Google Ad conversion action in Google Tag Manager.
Setting Up Form Conversions in Google Tag Manager
After configuring your conversion action in Google Ads, on the ‘Get instructions and finish’ section of the conversion action setup page, click the tab ‘Use Google Tag Manager’ and you will be provided with a Conversion ID as well as a Conversion Label. Keep this tab open as we will need to use both of these in just a minute here.
Now, let’s begin setting up your Google Ads conversion action tag in Google Tag Manager. (If you do not have one already, you will need to create a Google Tag Manager account to continue.
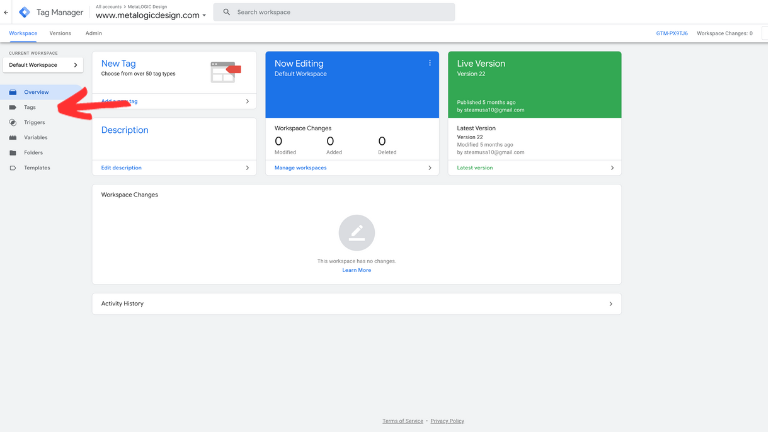
From the ‘Overview’ page, click the ‘Tags’ tab on the left hand side and click ‘New’ to begin creating a new tag.
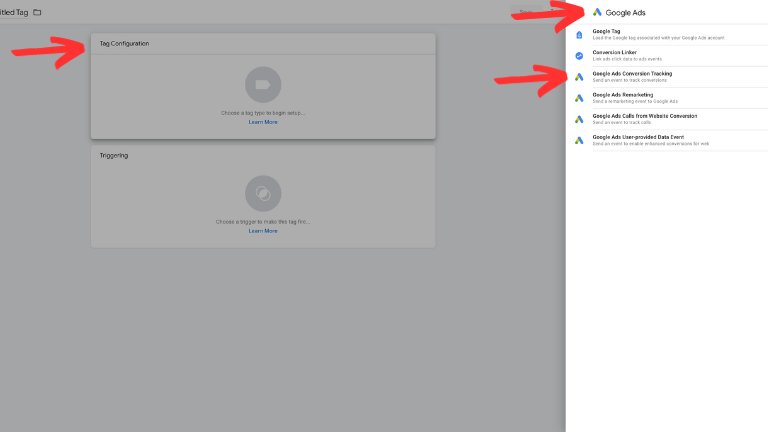
Click ‘Tag Configuration’ > ‘Google Ads’ > ‘Google Ads Conversion Tracking’ to configure your tag type.
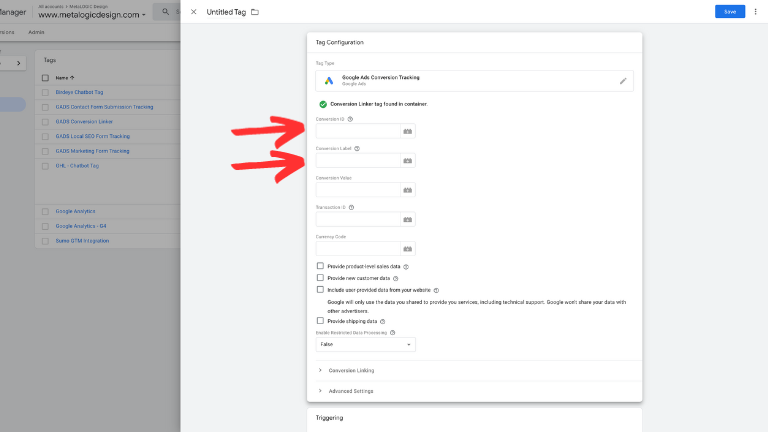
Remember the Conversion ID and Conversion Label that we received from Google Ads after setting up our conversion action? Reopen that tab and copy both of those from Google Ads into Google Tag Manager.
Next, we are going to configure the triggering options of your Google Tag
Click ‘Triggering’ under ‘Tag Configuration’ to select when this trigger will be fired.
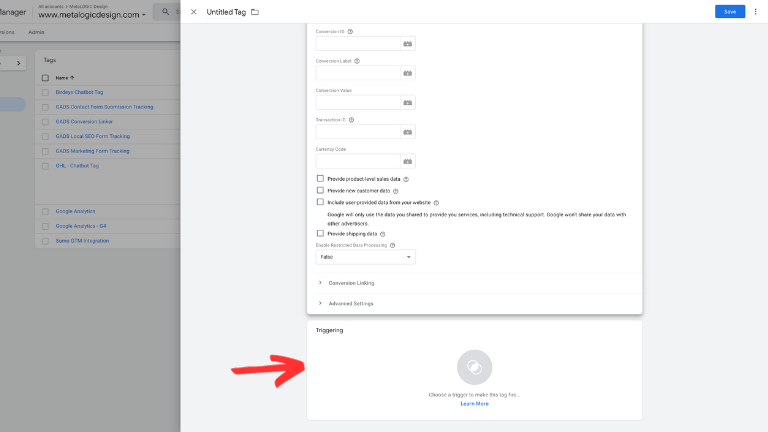
Next, click the blue + button in the upper right hand corner to create a new trigger.
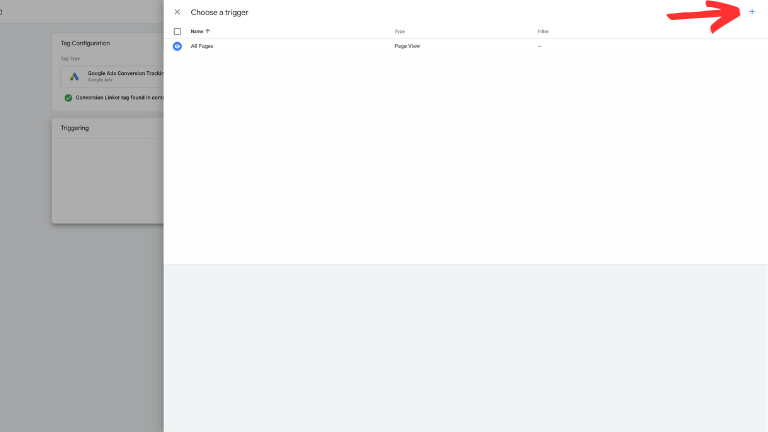
Click ‘Tag Configuration’ on this page and select ‘Page View’ ad your trigger type.
Toggle ‘Some Page Views’ under ‘This trigger fires on’ and under ‘Fire this trigger when an Event occurs and all of these conditions are true’ select the options ‘Page URL’ > is > and paste the URL in which web visitors are taken to after they submit a form.
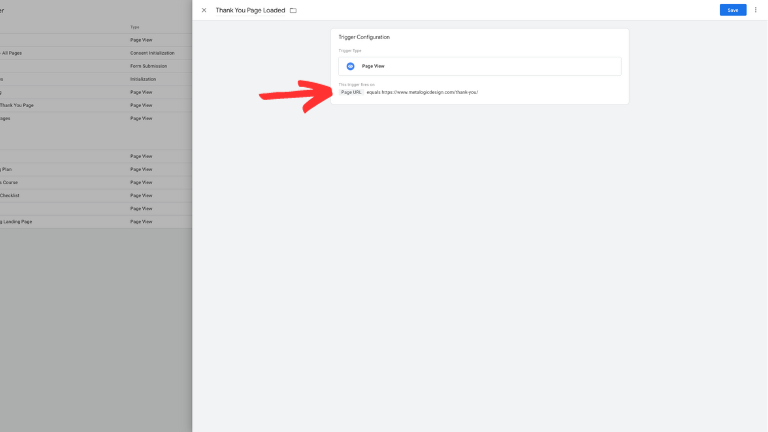
Remember to name this new trigger and click ‘Save’ at the upper righthand corner.
Once you have configured your tag and triggering options, don’t forget to name your tag and click ‘Save’ in the upper right-hand corner.
Finally, click ‘Submit’ > ‘Publish’ to submit the changes to your Google Tag.
Steps to Add Google Tag Manager to Your Website
WordPress
- Open your Tag Manager account and copy the details highlighted in blue on the overview page.
- Log in to your WordPress site and navigate to the “Plugins” section.
- Click “Add New” on the plugins page and use the search bar to look for “Google Tag Manager.”
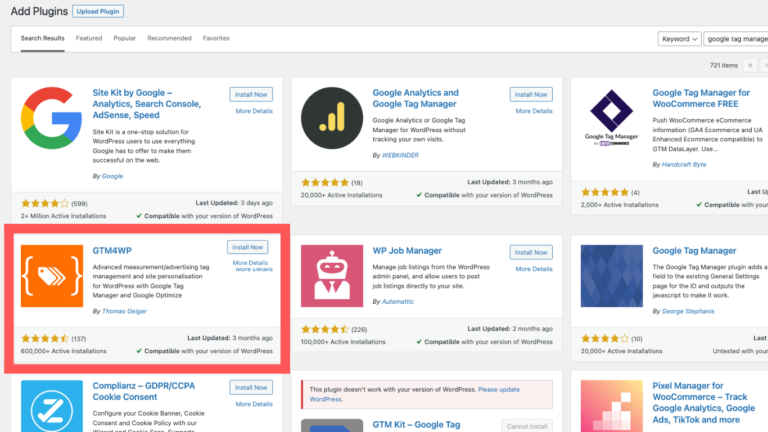
- Locate and install the plugin named GTM4WP by Thomas Geiger.
- Access the plugin settings by hovering over the “Settings” option.
- Choose “Google Tag Manager” and paste the information you copied in step 1.
- Keep the container code placement set to “Footer of the page” and click “Save Changes” to ensure proper tracking.
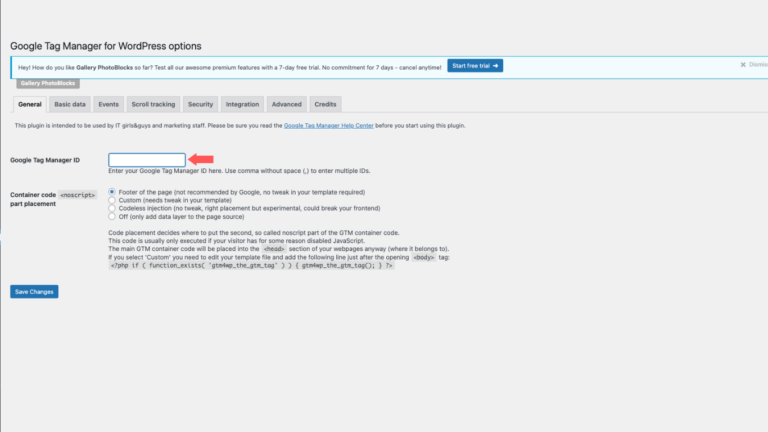
Congratulations, you’ve successfully set up Google Tag Manager on your WordPress site!
Other Sites
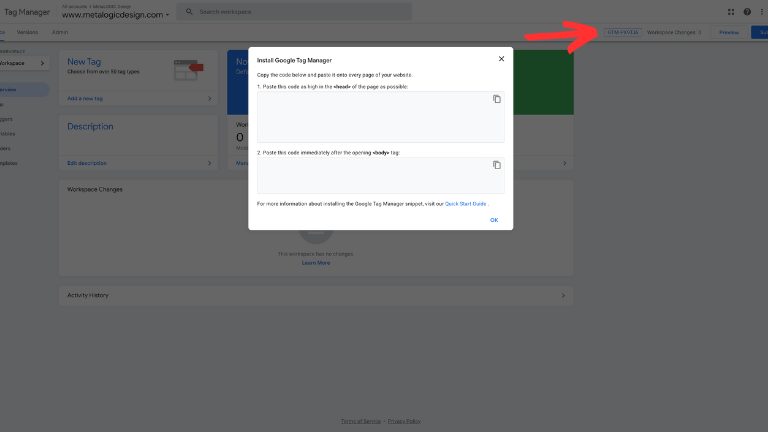
When using website hosting platforms like Squarespace or Wix, you must incorporate the Google Tag Manager code snippet into every page of your website. To obtain this code, click on the Google Tag highlighted in blue on the overview page of your Tag Manager account. This action will trigger a pop-up window containing two segments of code. The initial segment should be inserted into the <head> section of each webpage, while the second one should be positioned right after the opening <body> tag.
Honestly, I consider him part of my Team as well, he really cares about our success. As we grow, he will grow with us. I’m excited about the journey and future with Mike and his Team at Metalogic! If you’re looking at Internet Marketing for your business, simply put he’s the best!

Chris Chustz
Owner, Family First Mortgage
Testing Your Google Tag Manager Implementation
Now that you have successfully configured your Google Tag in Google Tag Manager and have installed the tag onto your website, the next step is to see if your tag is firing correctly and everything is in order.
Using Google Tag Assistant Legacy
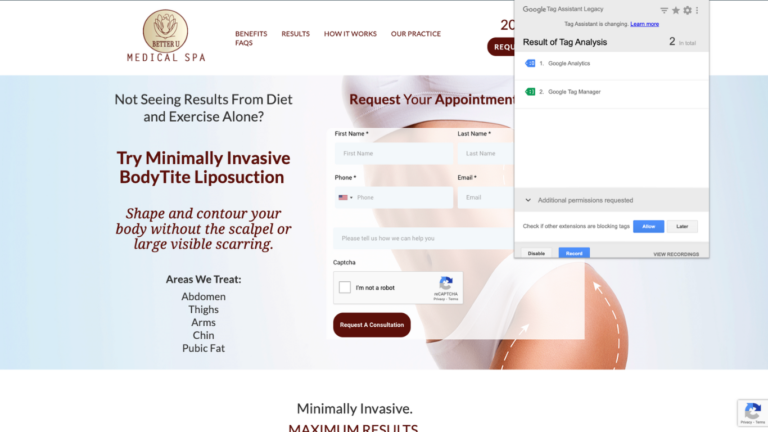
If Google Chrome is your preferred browser, access the Chrome Web Store and search for “Google Tag Manager.” From the search results, choose “Tag Assistant Legacy (by Google)” and add the extension to your browser. To verify successful installation, keep an eye out for a blue, cheerful tag icon located on the right side of your search bar. If it’s not visible, access “Manage Extensions” by clicking the puzzle piece icon on the right side of the search bar and activate the Tag Legacy Assistant.
Once the extension is activated, click on the blue, smiling tag icon and select “Enable.” Next, return to your container URL and refresh the page. Utilize the Tag Legacy Assistant to inspect all the tags on the page, ensuring that all the tags you set up in Google Tag Manager are triggering correctly.
Using Google Tag Manager
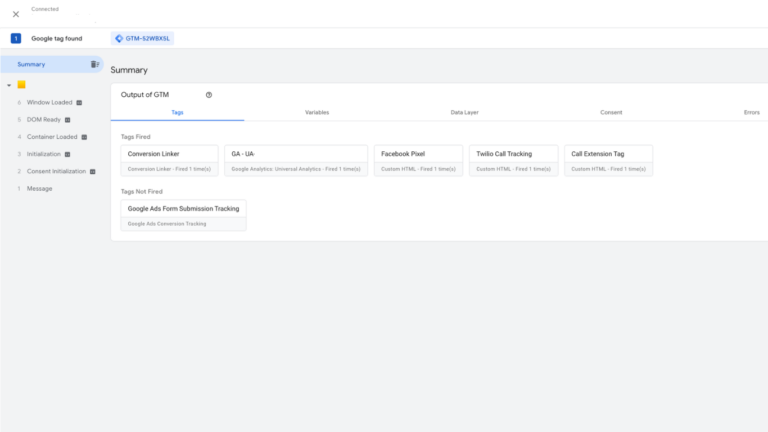
Begin by clicking the “Preview” button located at the top right corner of your workspace to initiate a preview of your Google Tag Manager container. This action will launch the Google Tag Assistant (Beta). Input the URL of your container into the designated field and click “Connect.” This will enable debug mode, providing you with visibility into any Google Tag errors and ensuring smooth operation.
Once your website is loaded, you will receive a notification from the Google Tag Assistant stating, “Google Tag Assistant Connected.” Return to the tab labeled “Tag Assistant [Connected]” to review the tags that were triggered and those that were not triggered on that specific page.
Additional Tips for Optimizing Google Ads with Tag Manager
Regularly Review and Update: Form conversion tracking is not a one-time setup. Regularly review your tracking data and conversion settings. As your website evolves and your business goals change, make necessary adjustments to ensure your tracking remains accurate and aligned with your objectives.
Set Up Goal Funnel Tracking: If your form submission process involves multiple steps (e.g., a multi-page form), consider setting up goal funnel tracking in Google Analytics in addition to form conversion tracking. This can help identify drop-off points and areas for optimization.
Implement Cross-Device Tracking: In today’s multi-device world, users often switch between smartphones, tablets, and computers. Implement cross-device tracking to understand how users interact with your forms across different devices, providing a more holistic view of user behavior.
Utilize Event Tracking: Beyond form submissions, consider implementing event tracking in Google Analytics to monitor other user interactions, such as video views, button clicks, and downloads. This data can provide valuable insights into user engagement.
Stay Informed: Stay up-to-date with the latest developments in Google Ads and Google Tag Manager. Google frequently releases updates and new features that can enhance your tracking capabilities and campaign performance.
Test and Experiment: Don’t be afraid to test out Google Ads experiments with different tracking configurations, ad variations, and landing page designs. A/B testing can help you discover what resonates best with your audience and continually improve your conversion rates.
Seek Professional Assistance: If you encounter technical challenges or need advanced tracking setups, consider consulting with a digital marketing professional or web developer. Their expertise can save you time and ensure accurate tracking.
Custom Marketing Plans Starting at $500 / month
Conclusion
In the world of online advertising, every click, impression, and conversion matters. The ability to track form conversions in Google Ads is not just a feature; it’s the key to unlocking the full potential of your advertising campaigns. By implementing form conversion tracking, you transform your advertising strategy from guesswork to data-driven precision.
Throughout this guide, we’ve explored the importance of form conversion tracking and provided you with a step-by-step roadmap for setting it up using Google Tag Manager. With these tools in your arsenal, you can measure advertising effectiveness, understand user behavior, allocate your budget wisely, refine ad creatives, calculate Google Ads ROI, enhance user experience, and align your marketing goals with your business objectives.
As you embark on your journey to set up Google Ads form conversions in Google Tag Manager, remember that the power of data-driven decision-making is at your fingertips. Continually monitor your campaigns, analyze the insights you gather, and optimize accordingly. In doing so, you’ll not only improve your advertising ROI but also stay ahead of the competition in the ever-evolving digital landscape.
Your success in online advertising hinges on your ability to adapt, refine, and innovate. Form conversion tracking is your secret weapon in this endeavor. Embrace it, master it, and watch your advertising efforts flourish.
Become A Google Ads Specialist With MetaLOGIC's Local Digital Marketing Academy
Get your business in front of the right people with Google Ads. From display and search campaigns to Shopping and video campaigns, there’s a way to reach your target audience on the Google Ads platform. Don’t wait to see results – Learn more about our Google Ads Online Training Course


