Google Tag Manager - A Step-by-Step Guide

Nick Czerwinski
PPC & Local SEO Specialist
Understanding Google Tag Manager and Its Benefits
Google created Google Tag Manager (GTM) in 2012 to make it easier for marketers to track and analyze their audience behavior and performance. GTM serves as a unified platform for marketers to manage all their tracking tags, from Google Analytics to Google Ads conversion tracking and retargeting, without having to modify the code of their website. With GTM, marketers have greater control over their tracking and can easily make changes and updates without needing technical assistance.
The user-friendly tool allows marketers to add tags, trigger events, and manage all their tracking tags in one place. The data collected by GTM can be seamlessly integrated into Google Analytics, providing a comprehensive view of audience behavior and performance. GTM also offers a variety of customization options, enabling marketers to tailor their tracking to their specific needs and goals.
Exploring the Benefits of Using Google Tag Manager
Simplifies website tracking and measurement
Google Tag Manager (GTM) is a powerful tool that simplifies website tracking and measurement by allowing users to add and manage various tracking and measurement tags without modifying the website code. Tag Manager saves time and reduces the need for technical expertise, making it easier for marketers and analysts to implement tracking and measurement independently.
With GTM, users can add tags for various purposes, such as tracking website traffic, user behavior, and conversion events. These tags can be easily added, configured, and published using the GTM interface without changing the website code. This not only simplifies the process of tracking and measurement but also ensures that all tags are accurately implemented and working correctly.
GTM provides a centralized solution for Google Ads conversion tracking and website measurement, making it easier for users to manage multiple tags and data sources from one place. This improves the accuracy of data collection and reduces the risk of incorrect data tracking, ensuring that businesses can make informed decisions based on reliable data.
Reduces dependency on developers
GTM empowers marketers and analysts to take control of their tracking and measurement efforts, eliminating the need for time-consuming developer involvement. With its centralized platform and user-friendly interface, GTM streamlines the tracking and measurement process, allowing non-technical users to quickly and efficiently implement and manage tags. This speeds up the tracking and measurement process and frees up valuable developer time to focus on more impactful initiatives. GTM provides a more agile, responsive, and efficient approach to tracking and measurement, enabling organizations to understand website performance and customer behavior better.
Supports multiple tags:
Google Tag Manager’s (GTM) ability to support multiple tags, including popular ones like Google Analytics and Google Ads Conversion Tracking, as well as custom tags, is a game-changer for website owners. With this feature, website owners have a bird’s eye view of their website’s performance and marketing campaigns, enabling them to make informed and data-driven decisions confidently.
This level of insight and control gives website owners a significant advantage, helping them maximize the return on their investment in their website and marketing efforts. With GTM, website owners can keep a finger on the pulse of their website, allowing them to make timely and effective adjustments that can improve their overall performance.
Improves website speed
Javascript can significantly hinder page load times, particularly for marketers. When Javascript dominates the page load process, other elements are prevented from loading until it has been completed, potentially causing visitors to become impatient and leave the page.
Traditionally, different sections of a page load in sequential order, known as synchronous loading. This can lead to slower page load times, but with GTM, tags are loaded as soon as they are ready and not in a specific order, resulting in faster page load times. GTM can load asynchronously and simultaneously fire tags on the page, saving time and enhancing the user experience.
Supports Multiple Users
GTM allows you to manage user access to tags, triggers, and variables within each container. This allows for control over who can create and edit these elements. The following access options are available in GTM:
No Access: The user cannot view the container in the account.
Read: The user can view the container, its tags, triggers, and variables but cannot make any changes.
Edit: The user can create workspaces and make changes but cannot create versions or publish them.
Approve: The user can create workspaces and versions and make changes but cannot publish.
Publish: The user can create workspaces and versions, make changes, and publish the container.
With these user access options, you can ensure that only authorized individuals can make changes to your GTM account, giving you peace of mind and greater control.
The importance of users and permissions in GTM lies in need for secure and controlled management of tracking and data collection elements. With the ability to add and edit tags, triggers, and variables, it’s crucial to ensure that only authorized individuals have access to these elements.
Granting access to the wrong person can lead to severe consequences, such as lost data, missed conversions, and even crashed websites. By carefully managing users and permissions in GTM, users can prevent these issues and maintain a high level of security and control over their website’s tracking and data collection.
Understanding the Structure of Google Tag Manager
Google Tag Manager (GTM) comprises three main parts: tags, triggers, and variables.
Tags: These are snippets of code or tracking pixels used to track specific actions on a website, such as page views, clicks, form submissions, and more.
Triggers: Triggers define when a tag should fire and collect data. For example, a trigger can fire a tag when a user visits a specific page or submits a form.
Variables: Variables store data that can be used in multiple tags and triggers. For example, a variable could be used to keep the URL of a page, which could then be used in multiple tags to track the pages that a user visits.
By combining tags, triggers, and variables, GTM allows users to track and collect data from their websites in a flexible and customizable manner, making it a powerful tool for website optimization and data analysis.
Containers: Containers in Google Tag Manager are essentially a way of organizing your tracking code for your website or app. A container holds your tags, triggers, and variables, which work together to track and measure specific actions on your site.
Each container is tied to a specific website or app and can have multiple tags, triggers, and variables to track different aspects of user behavior. You can have various containers for other websites or apps, making it easy to manage your tracking code across multiple properties.
Tags
Tags are the lifeblood of tracking in Google Tag Manager. They are tiny pieces of code that allow you to track and measure specific actions on your website or app, so you can gain valuable insights into how your users interact with your digital properties.
Google Tag Manager offers a wide range of tags that cater to different tracking needs, such as:
Universal Analytics Tag: With this tag, you can send data to Google Analytics, including page views, events, and transactions, giving you a clear picture of how your users are interacting with your site.
AdWords Conversion Tracking Tag: This tag is the perfect tool to help you keep track of conversions on your website, such as purchases or form submissions.
AdWords Remarketing Tag: By using this tag, you can create remarketing lists and serve personalized ads to users who have interacted with your website, helping you reach your target audience more effectively.
Custom HTML Tag: This tag gives you the flexibility to add custom HTML or JavaScript code to your website, allowing you to track actions that are not possible with other tags.
Custom Image Tag: This tag is perfect for tracking custom image requests, such as button clicks or page load times.
Google Optimize Tag: This tag opens up the world of website optimization and A/B testing with Google Optimize, helping you make data-driven decisions that improve the user experience on your site.
By utilizing tags in Google Tag Manager, you have the power to track and measure key user interactions and gain valuable insights that can help you optimize your digital properties for success.
Triggers
Triggers in Google Tag Manager are conditions that determine when a tag should fire or run on a website or app. Triggers specify the exact circumstances under which a tag should be activated, such as when a specific button is clicked, a page is viewed, or a form is submitted.
For example, you can set up a trigger to fire a Google Analytics event tag when a user clicks a specific button on your site or a conversion tracking tag when a user completes a purchase. Triggers can be based on various conditions, such as:
Page View: This trigger is activated when a specific page is viewed, allowing you to track essential actions like pageviews.
Click: This trigger is activated when a specific link or button is clicked, providing insight into user engagement with your site.
Form Submission: This trigger is activated when a form is submitted, making it easy to track form completions.
History Change: This trigger is activated when the URL changes in the browser, giving you a better understanding of user behavior.
Timer: This trigger is activated after a set amount of time has elapsed, helping you track necessary actions like page load times.
Custom Event: This trigger is activated when a custom event is fired through JavaScript, providing even more flexibility in tracking actions on your site.
Triggers are an essential component of tag management in Google Tag Manager. Using triggers gives you fine-grained control over when and how tags are activated, allowing you to track the most critical actions.
Understanding Variables and Their Use in Google Tag Manager
Variables are an essential aspect of tags and triggers in Google Tag Manager. Within tags, they capture dynamic information, such as transaction amounts upon a purchase. On the other hand, triggers use variables to establish filters that activate the trigger. When a user lands on the “/thank-you” page, the URL variable will be set to “/thank-you.”
Google Tag Manager offers an array of Built-In Variables to cater to tracking needs, such as Pages, Utilities, Errors, Clicks, Forms, and History. These Built-In Variables make data gathering for your tracking effortless and convenient. Additionally, you also have the option to create custom User-Defined Variables to meet your unique tracking requirements.
Containers
Once your GTM account is set up, you can create one or multiple containers for different websites. Each container serves as a unique hub for all the tags, triggers, and variables for a specific website and is identified by a container ID. This central location makes it effortless to manage and deploy tags for that website. The tags, triggers, and variables are the core components of a container, essentially forming the backbone of the entire GTM system.
Honestly, I consider him part of my Team as well, he really cares about our success. As we grow, he will grow with us. I’m excited about the journey and future with Mike and his Team at Metalogic! If you’re looking at Internet Marketing for your business, simply put he’s the best!

Chris Chustz
Owner, Family First Mortgage
Step-by-Step Guide: Creating Your Google Tag Manager Account
Getting started with Google Tag Manager is simple. Visit tagmanager.google.com and set up your account if you still need to get one linked to your preferred email address. After you have named your company, you will set up the container for the website you want to manage.
We suggest naming your container after the website’s URL for organization purposes. Once you have selected your container name, choose the platform where you want to set up the container, including Web, iOS, Android, AMP, or Server.
Click the blue “create” button at the bottom of the setup page and accept the Google Tag Manager Terms of Service Agreement. With that, you have successfully established your account and container, which will be the foundation for all your tags, triggers, and variables to track information flow on your website.
Installing Google Tag Manager On Your Website
WordPress
To set up Google Tag Manager on your WordPress site, follow these steps:
1. Go to your Tag Manager account and copy the information in blue from the overview page.
2. Log in to your WordPress site and go to the plugins section.
3. Click “Add New” on the plugins page, and in the search bar, type “Google Tag Manager.”
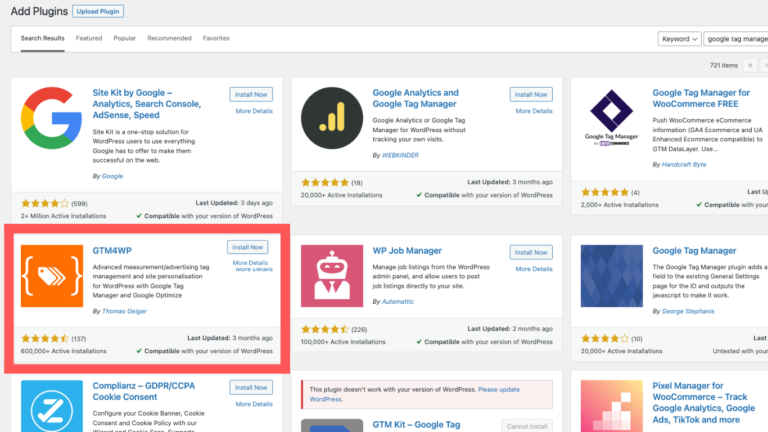
4. Find and download the plugin called GTM4WP by Thomas Geiger.5. Access the plugin settings by hovering over the “Settings” option.
6. Select “Google Tag Manager” and paste the information you copied from step 1.
7. Leave the container code placement as “Footer of the page” and click “Save Changes” to ensure proper tracking.
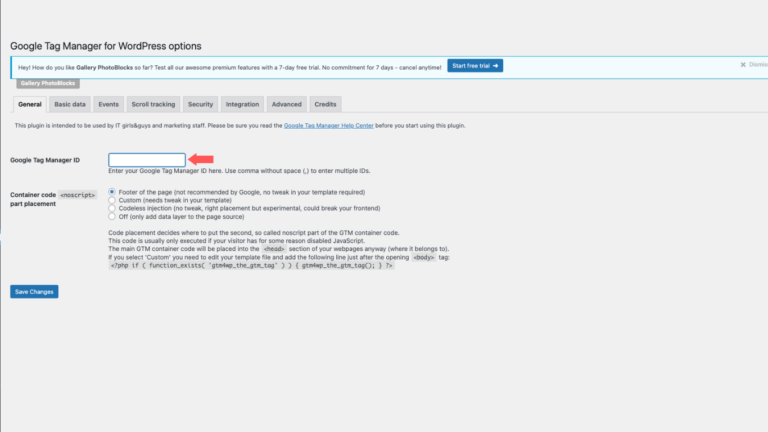
Now you are all set with Google Tag Manager on your WordPress site!
Other Sites
If you use a website hosting platform such as Squarespace, Wix, etc., you’ll need to include the Google Tag Manager code snippet on every page of your website. To retrieve this code, click on the blue-highlighted Google Tag name on the overview page of your Tag Manager account. This will bring up a pop-up window that contains two pieces of code. The first piece needs to be added to the <head> of each webpage, and the second piece should be placed immediately after the opening <body> tag.
Custom Marketing Plans Starting at $500 / month
Creating Your First Tag in Google Tag Manager
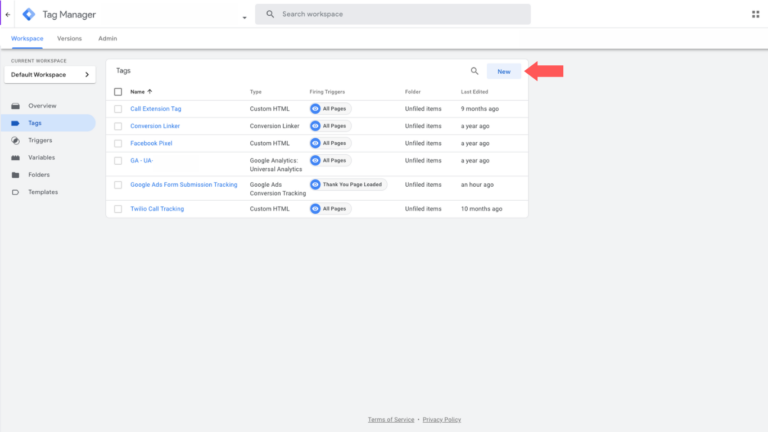
Creating your first tag in Google Tag Manager is a straightforward process. From your workspace, navigate to the Tags tab on the left-hand side and click the blue “New” button to start.
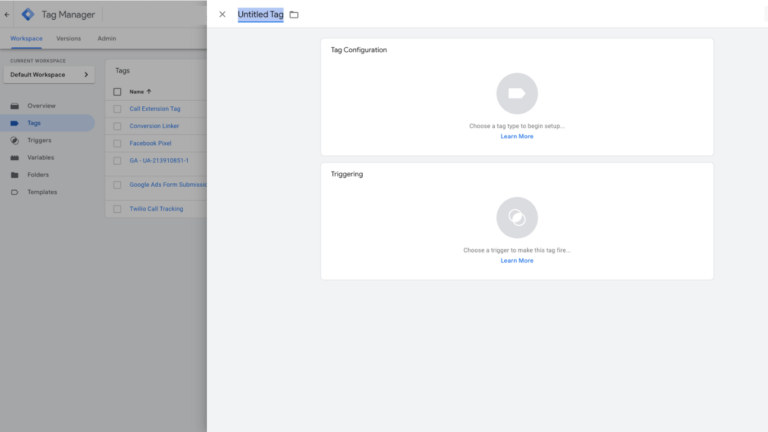
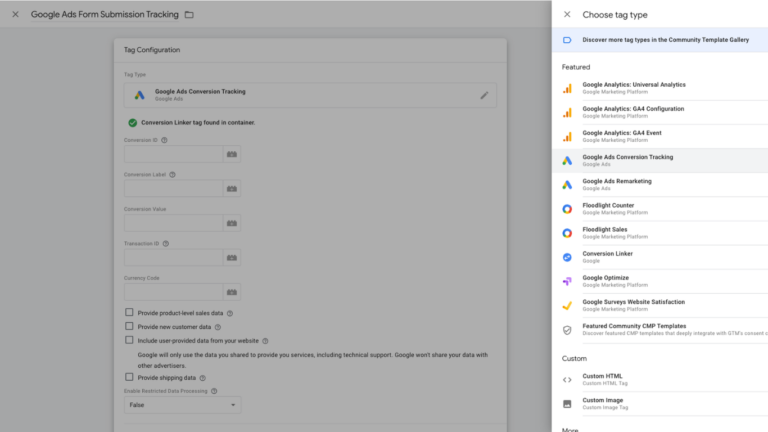
Give your tag a descriptive name that reflects its purpose. For instance, if you’re tracking conversions on Google Ads, name your tag “Google Ads – Form Submission Tracking.” Then, choose the type of tag you want to create from the available options, including Google Analytics, Google Ads Conversion Tracking, Custom HTML, and others. Depending on the tag you’re configuring, specific tags may require additional information, such as your Conversion ID, HTML code, or Measurement ID.
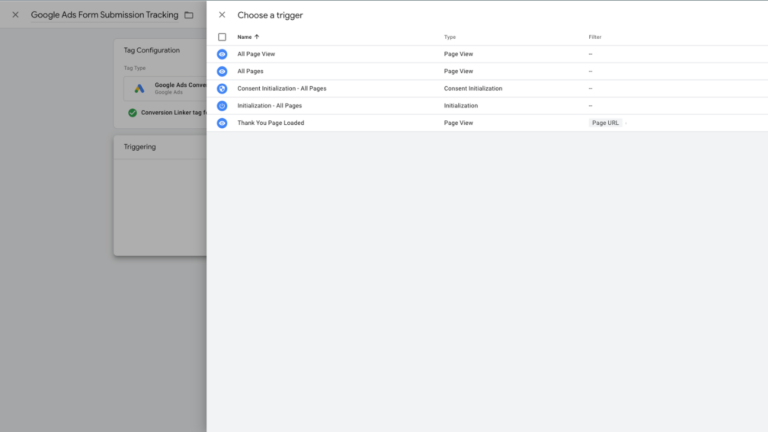
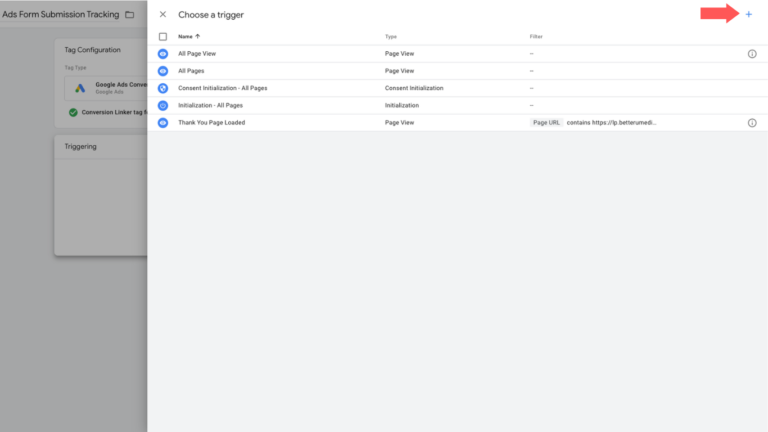
Once your tag is set up, it’s time to select triggers to determine which pages you want the tag to fire on. For example, if you’re tracking Google Ads conversions, your trigger will likely be a thank-you page that a customer reaches after making a purchase or filling out a form. On the other hand, if you’re setting up Google Analytics, you’ll want to track your users’ journeys across all pages, so your tag should fire on all pages.
When ready, save your trigger by clicking the blue save button at the top right, then press submit. To keep things organized, you can create a version name, description, and other notes on the submit screen. For future reference, you can add notes in the “Container Version Description” pop-up. After you’ve completed this step, your tag will be published on your site and ready to use.
Creating Triggers for Tags in Google Tag Manager
Testing and Validating Tags in Google Tag Manager
Using Google Tag Assistant Legacy
If you use Google Chrome as your browser, open the Chrome Web Store and search for “Google Tag Manager.” In the results, select “Tag Assistant Legacy (by Google)” and add the extension to your browser. You can check if the extension has been installed successfully by looking for a blue smiling tag icon on the right side of your search bar. If it is not visible, go to “Manage Extensions” by clicking the puzzle piece icon on the right side of the search bar and turn on the Tag Legacy Assistant.
Once the extension is enabled, click the blue smiling tag and select “Enable.” Now, navigate back to your container URL and refresh the page. Click on the Tag Legacy Assistant to view all the tags on the page to ensure that all the tags you submitted on Google Tag Manager are firing correctly.

Using Google Tag Manager
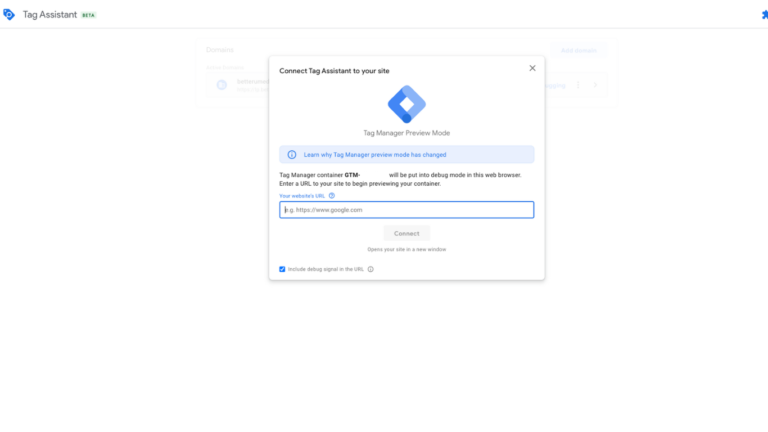
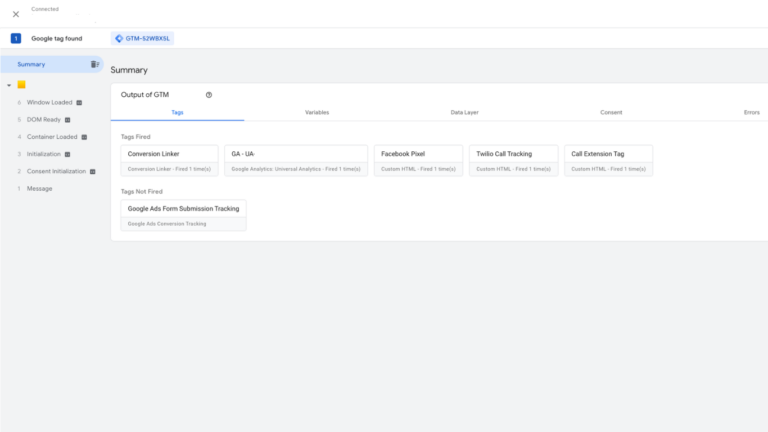
Start by clicking the “Preview” button at the top right corner of your workspace to preview your Google Tag Manager container. This will launch the Google Tag Assistant (Beta). Copy and paste the URL of your container into the designated field and hit “Connect.” This will activate debug mode, allowing you to view any Google Tag errors and ensure that everything runs smoothly.
With your website now loaded, you will receive a notification from the Google Tag Assistant saying, “Google Tag Assistant Connected.” Go back to the tab marked “Tag Assistant [Connected]” to see which tags fired and which ones didn’t fire on that page.
Exploring Advanced Capabilities of Google Tag Manager
Versions
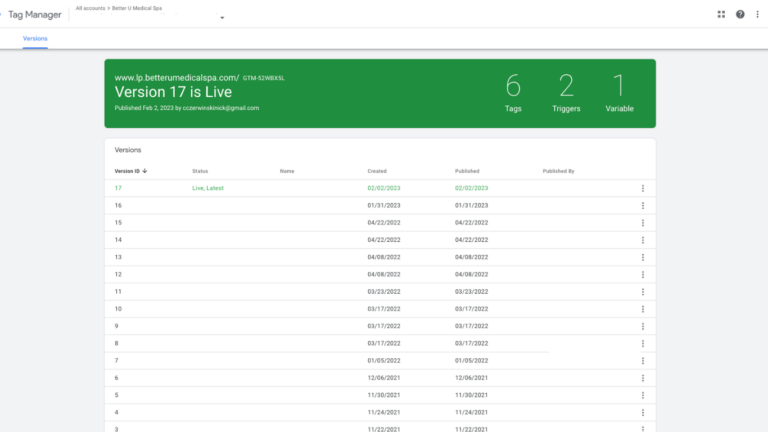
Every time you publish a modification to your Google Tag Manager container, a new version is created, providing you with a comprehensive history of changes and who made them. This allows you to easily track updates, ensuring you have a complete record of your GTM progress.
If something goes wrong and a tag no longer functions, you can revert to a previous version of GTM. By visiting the Versions section, you can view the most recent version, see who created and published it, and review the Version items such as tags, triggers, and variables.
Having a record of past versions gives you peace of mind, knowing that you have a backup in case something goes awry. Whether you’re working on your own or collaborating with others, versioning provides a safe and effective way to manage changes to your GTM container.
Folders
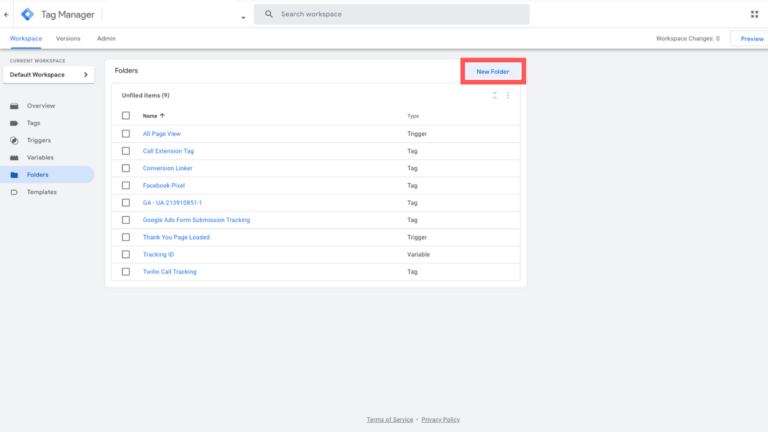
Organizing your tags, triggers, and variables have never been easier. With the familiarity of Dropbox or Google Drive, navigating Google Tag Manager’s folders will come naturally. This feature is crucial for teams and marketers working on a shared Tag Manager account, keeping everyone and everything organized in one place.
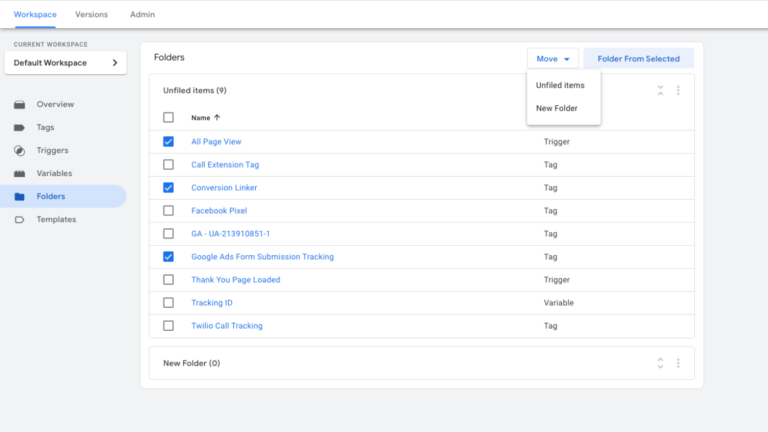
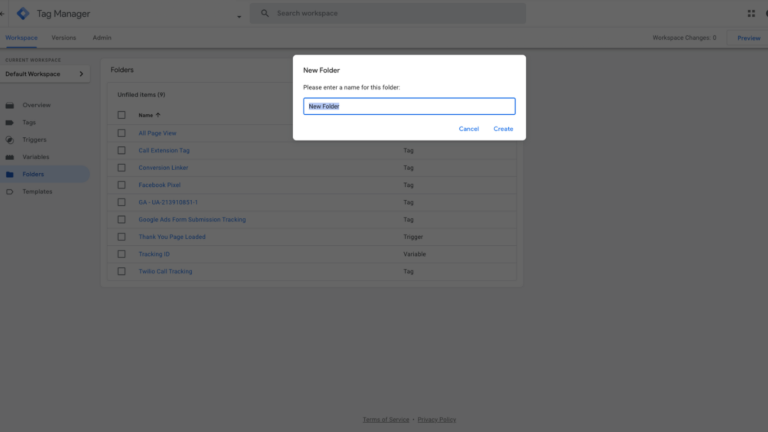
Creating a folder in Google Tag Manager is a breeze. Go to the “Folders” tab on the left side, and hit the blue “New Folder” button. Name your folder, click “Create,” and you’re ready. To add items to your newly created folder, select them under “Unfiled Items” and hit “Move.” A dropdown will appear, allowing you to add items to your folder effortlessly.
Workspaces
Google Tag Manager Workspaces is a collaborative solution to streamline team tag management. With workspaces, multiple users can work together on a single Tag Manager account, effortlessly dividing different stages of tag development, such as testing and production. This results in thorough tag testing before any live implementation, giving teams peace of mind and the confidence to roll out tags easily.
Each workspace operates independently, with its own unique set of tags, triggers, and variables, allowing team members to work on different aspects of the implementation without interfering with one another. Plus, the added benefit of version control ensures teams have a complete history of tag updates and the ability to revert to previous versions if needed.
Starting a new workspace is simple, with the option to create one from scratch or clone an existing one, saving teams time and effort. Teams can even share their workspaces with stakeholders for review, allowing for efficient collaboration and feedback before the tags go live.
Event Tracking
Event tracking in Google Tag Manager is a powerful feature that allows you to measure user interactions on your website, such as button clicks, form submissions, and page scrolls. By tracking these events, you can gain valuable insights into how users interact with your website, which can help you make data-driven decisions to improve your online presence.
To set up event tracking in GTM, you first need to define an event trigger. This trigger specifies the user action you want to track, such as a button click or form submission. Once the trigger is defined, you can create a tag that sends the event data to your preferred analytics tool, such as Google Analytics.
The beauty of event tracking in GTM is its versatility. You can track virtually any user interaction and use the data collected to inform your website optimization efforts. For example, you can track which buttons on your website get the most clicks or track form submissions to see which forms convert at the highest rates.
Additionally, GTM provides advanced reporting and analysis capabilities, allowing you to dig deep into the event data and gain valuable insights into user behavior. With this information, you can make informed decisions about improving your website’s user experience.
Templates
Google Tag Manager Templates are pre-built containers for tags, triggers, and variables that simplify implementing and managing these elements on a website or mobile app. With templates, users can quickly set up standard marketing and analytics tags without manually writing the code, saving time and making the process accessible to those without technical expertise.
Templates also ensure consistency in tag implementation, providing accurate data collection and analysis. They are regularly updated with new features and best practices, ensuring that users always use the latest technology and follow industry standards. By reducing the chance of human error, templates improve the accuracy of data collection and analysis.
Using templates in Google Tag Manager is easy. Select the template you want to use and customize it to fit your needs. The template’s pre-configured tags, triggers, and variables provide a solid foundation. The customization options allow users to tailor the implementation to their unique requirements. Whether you are a seasoned marketer or just starting out, templates offer a convenient and efficient way to implement and manage your tags in Google Tag Manager.
Scroll Tracking
Scroll tracking in Google Tag Manager is a valuable tool for measuring how far down a page your website visitors scroll. This information can help you better understand user behavior and make data-driven decisions about the design and content of your website.
To set up scroll tracking in GTM, you need to create a trigger that listens for the scroll event on your website. You can set specific thresholds for the trigger, such as 50% or 75% of the page height, so the trigger only fires when the user has scrolled to a certain point. Once the trigger is set up, you can create a tag that sends the scroll data to your preferred analytics tool, such as Google Analytics.
With scroll tracking, you can determine how much of your website content is being viewed by your visitors and make improvements to increase engagement. For example, you can identify which pages have low scroll depth and make changes to the layout or content to encourage users to keep scrolling.
Additionally, scroll tracking provides valuable data for conversion rate optimization efforts. You can see how far down the page users scroll before they leave the website and use that information to optimize your page design and calls to action to increase conversions.
Conclusion
Become A Google Ads Specialist With MetaLOGIC's Local Digital Marketing Academy
Get your business in front of the right people with Google Ads. From display and search campaigns to Shopping and video campaigns, there’s a way to reach your target audience on the Google Ads platform. Don’t wait to see results – Learn more about our Google Ads Online Training Course.


